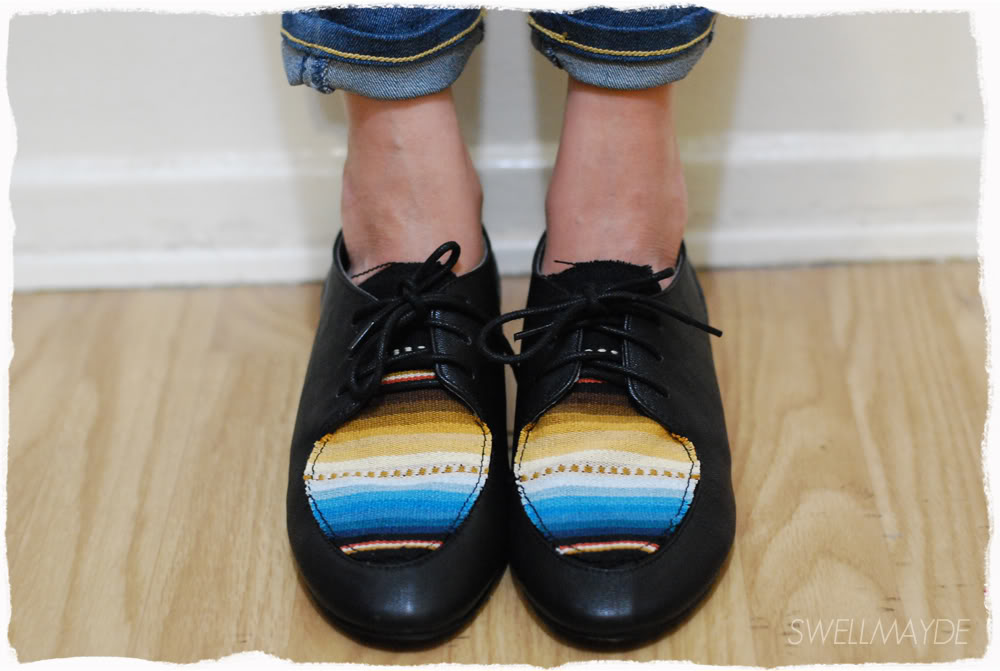
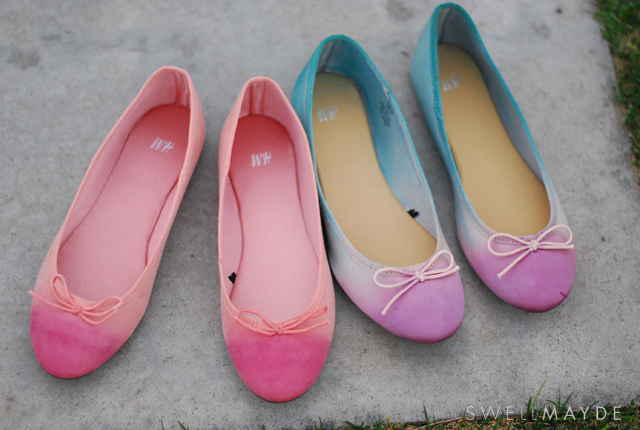
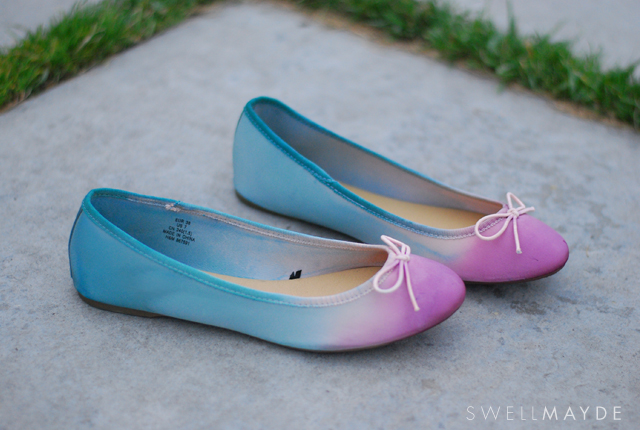
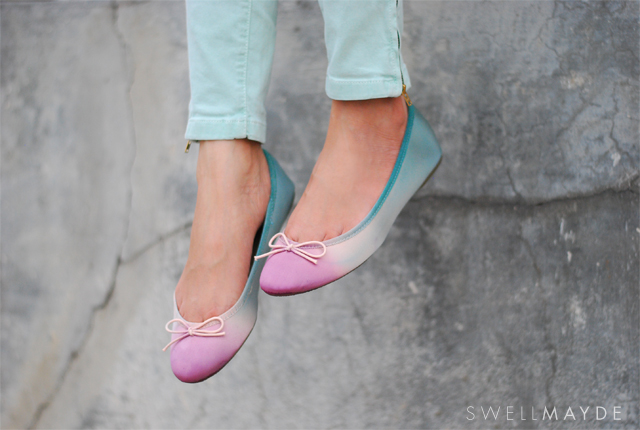
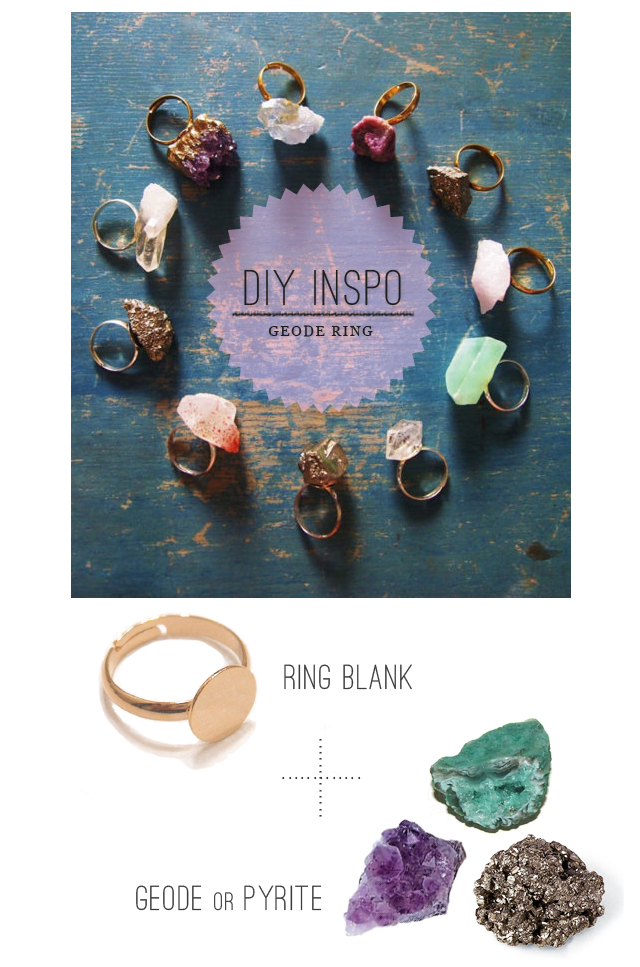
DIY: Serape Print Shoes

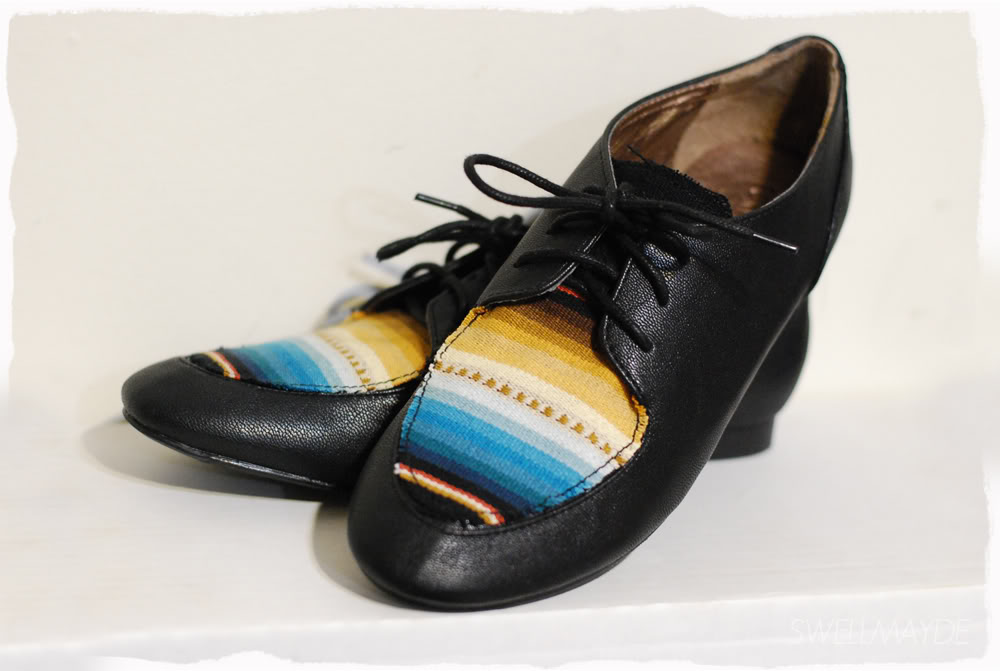
If you you've taken a peek at my  blog…  you probably noticed how much I love myself some ethnic prints. I especially love it in small pops in a wardrobe and thought it would look great on the upper portion of this shoe. The steps are pretty simple and can be used on a variety of different shoe styles, maybe something that's already in your closet. Here's how...
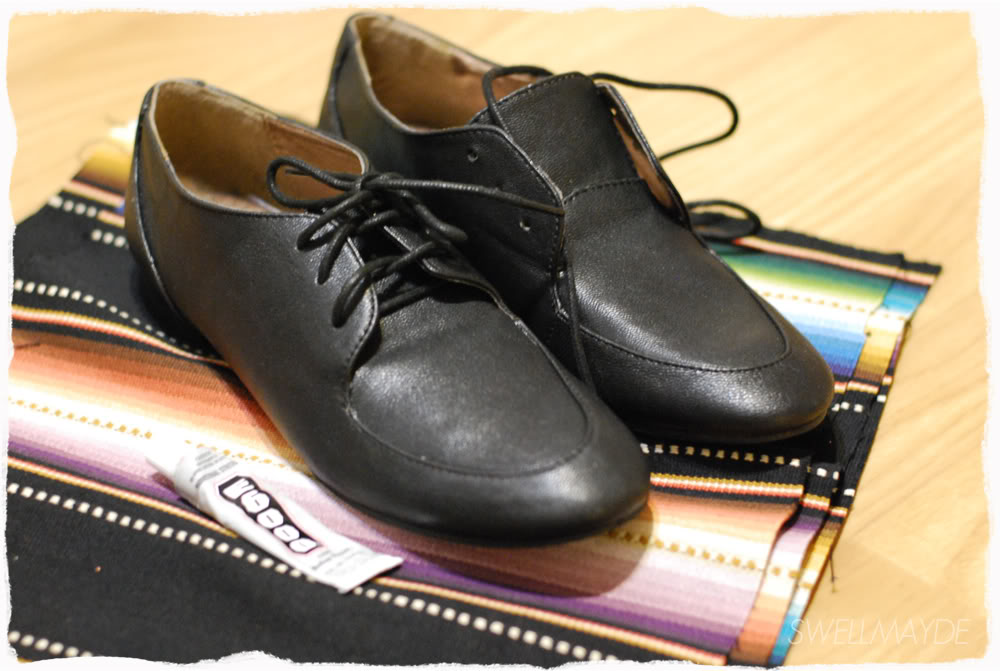
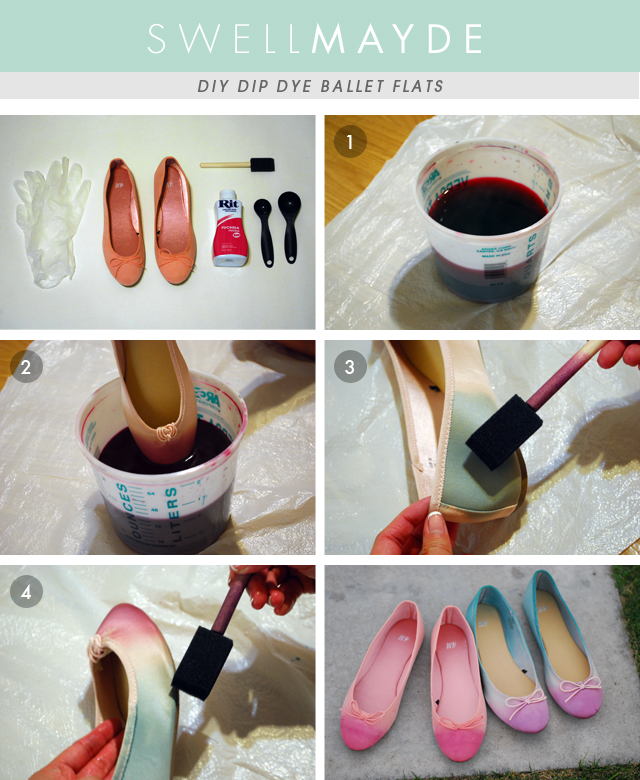
 

Materials:
- shoes
- serape print fabric (or any print you fancy)
- e6000 glue
- scissors
- pencil
- tracing paper
- tape
Steps
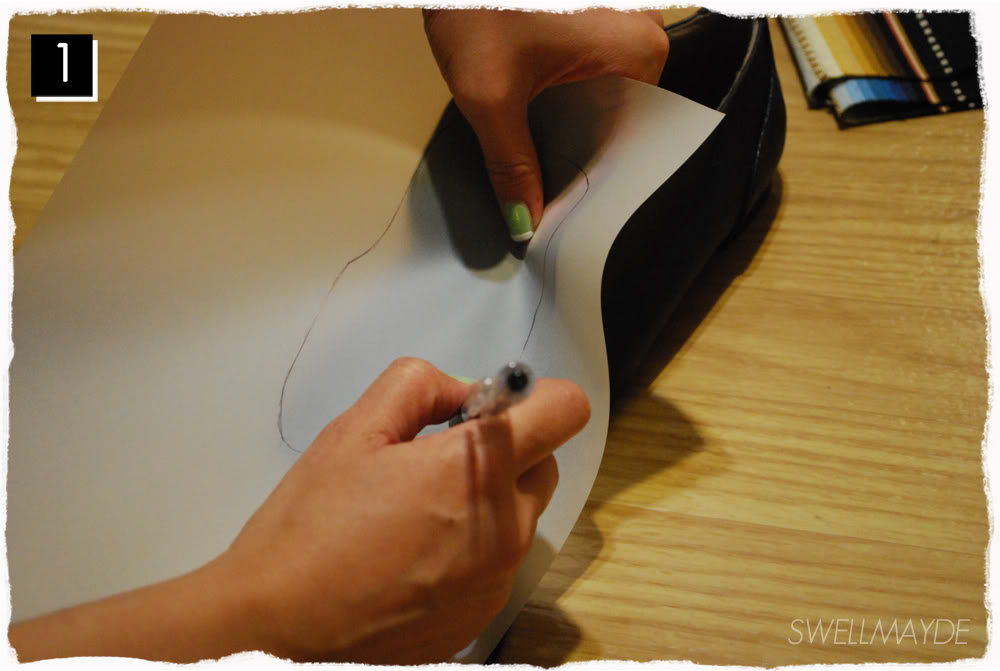
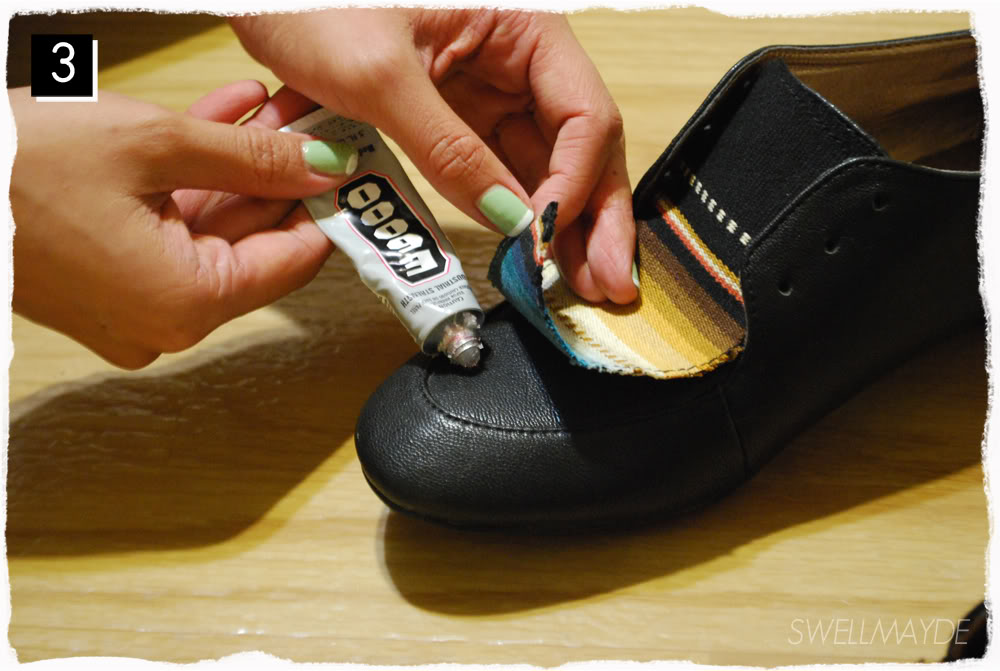
1. Trace the region of the shoe you would like the fabric to be placed on.
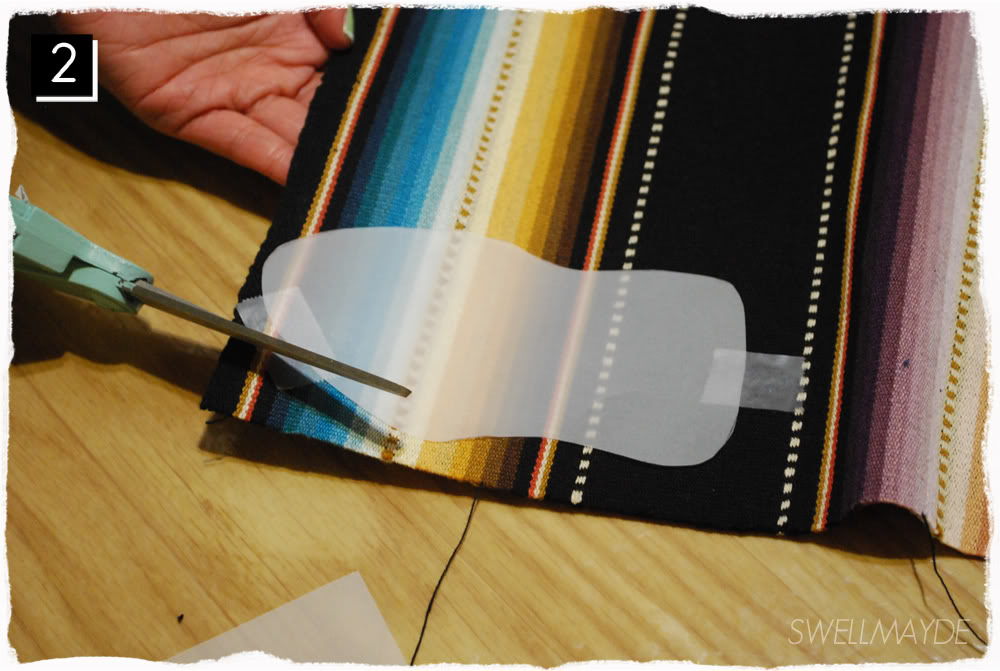
2. Cut out the drawn pattern. Tape the pattern onto the fabric and cut out.  Remember to do a left and right side.  Using a sewing machine, sew a topstitch around the edge of the cut fabric shapes.
3. Glue fabric onto the shoe using e6000.  There you go!  Easy breezy!!  SwellMayde serape shoes!

DIY: Painted Rhinestone Necklace

model1-3.jpg

I love the idea of adding some color into my wardrobe for Spring. The easiest way to do so is with accessories. When I saw these necklaces from Tom Binns, I immediately knew what my next DIY would be. The DIY steps are simple and allow you to update a rhinestone necklace that may have been sitting in your drawer since prom.

materials-3.jpg
step1-9.jpg
step2-9.jpg
step3-9.jpg
model2-1.jpg

Materials:

Spray Paint

Scrap Paper

Permanent Markers

Rhinestone Necklace (Similar 

Here

 and 

Here)

Scissors

Masking Tape

Steps:

1. Cut scrap paper to cover areas of necklace that you do not want to spraypaint. Tape paper in place.

2. Spray paint necklace to desired color. This will give a more opaque look. Repeat steps 1 and 2 for different sections of the necklace to create a fun color combination.

3. Marker in certain sections with the permanent markers to achieve a colored, yet translucent look.

4. Easy breezy!! Enjoy your SwellMayde DIY Painted Rhinestone Necklace.

DIY: Chain Link Bracelet

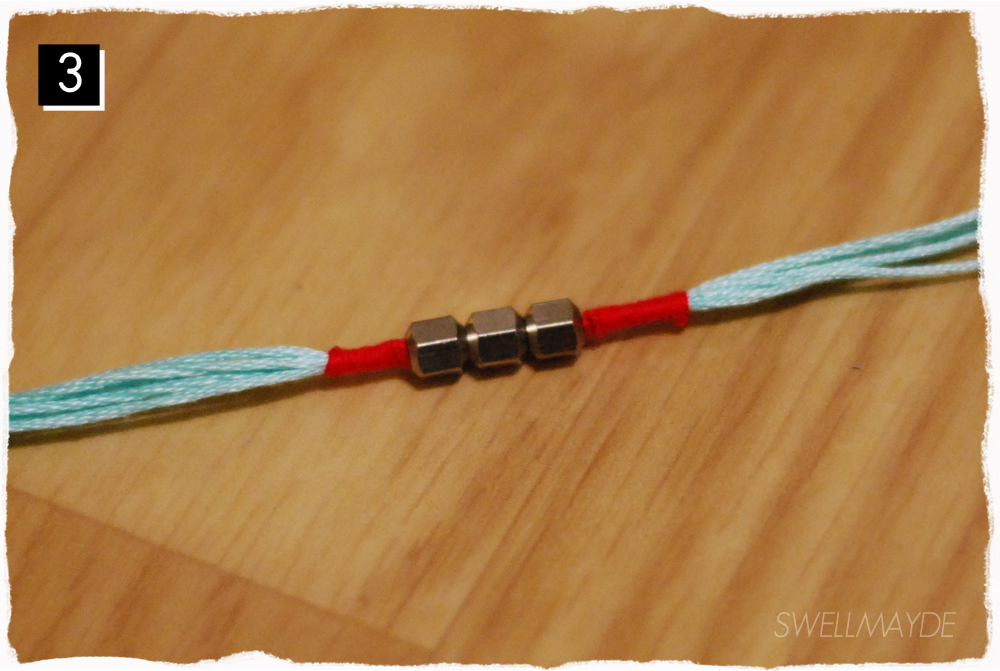
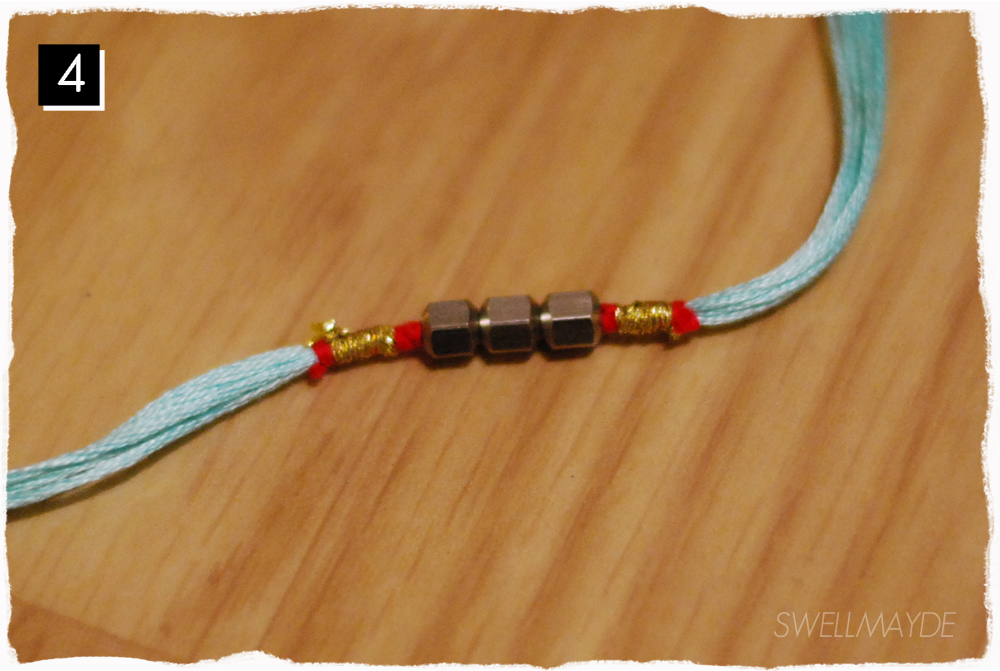
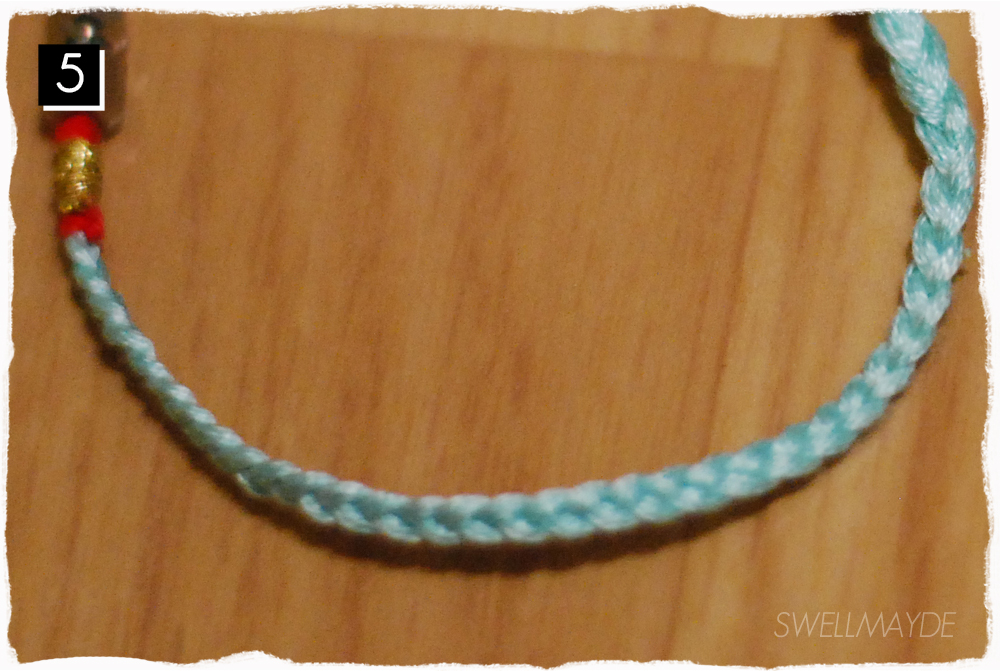
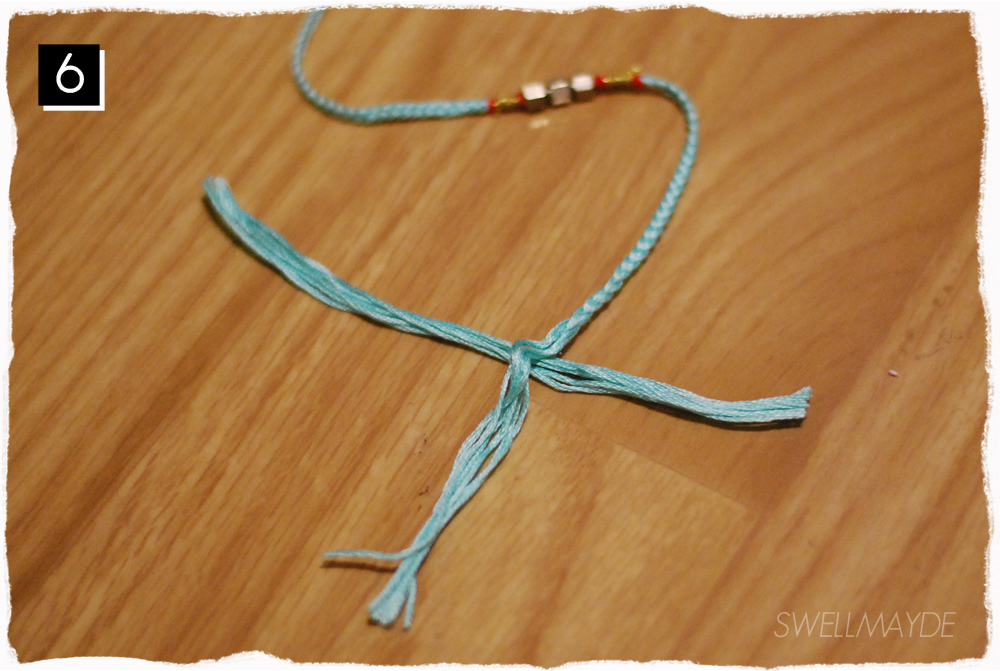
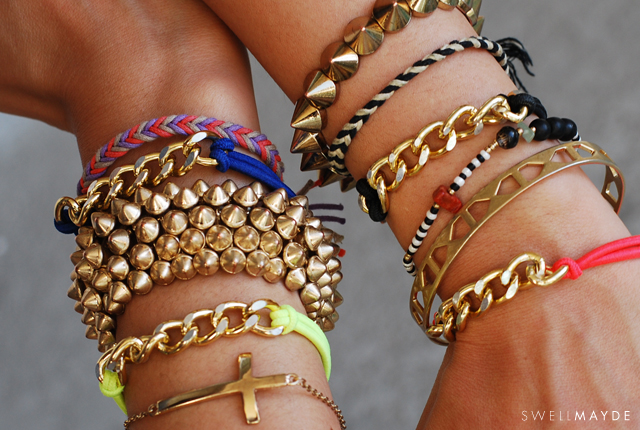
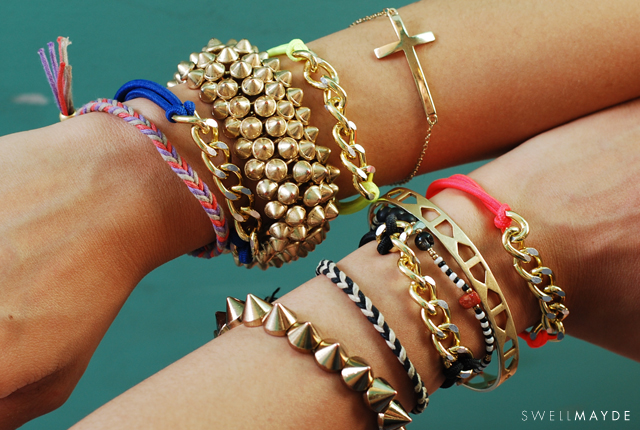
I have been really inspired by chain bracelets lately.  Here is the first of 2 chain bracelet DIY's. When I saw this beautiful Marc Jacobs bracelet (here), I instantly knew what my next DIY would be. I love the gold chain against the elastic band. It feels chic, yet casual. Here's how to make your very own. Pretty easy peasy! Full tutorial after the break...

Materials: - elastic rope (here) - chain (similar here) - clamp (bought from Athenian Fashions) - pliers - sewing thread - e6000 adhesive

Steps: 1. Cut the 2 length of elastic rope (about 5 1/4" to 6" depending on your wrist size). Then, cut 1 piece of chain about 2" long. 2. Fold one cut elastic rope and fold in half. Loop through one end of the chain. 3. Take the two ends of the elastic and put through the loop. 4. Pull the two ends of the elastic tightly. Repeat steps 2 through 4 for the other elastic rope. 5. Hold all 4 ends of the elastic rope, add a dab of e6000, then wrap tightly with sewing thread. This will keep all the ends in place. 6. Add a small dab of e6000 onto the inside of clamp. 7. Place the clamp onto the wrapped ends. Tightly squeeze each side of the clamp using the pliers to secure the ends of the elastic rope.

Dip Dye Ombre Ballet Flats

Ombre has definitely become one of my favorite trends of the season and when I discover a new iteration of it, I get really excited and have to emulate it. For this DIY, I was inspired by these beautiful dip dyed ballet flats from Anthropologie. Here's how to create your own...

Materials:
- ballet flats (mine are poly satin and faux suede from H&M, but works best with natural fabrics like suede and cotton)
RIT liquid dye ( purple, fuschia, and teal)
- measuring spoons
- gloves
Steps:
1. Create your dye baths. First, boil water. You will need about 4 liters.  For the fuschia dye bath, pour about 1 1/4 liters of water, along with 3 tablespoons of salt into a container. Then, add about 3 tablespoons of fuschia RIT dye. For the purple dye bath, pour about 1 1/4 liters of water, along with 3 tablespoons of salt into a container.  Then, add about 2 tablespoons of fuschia RIT dye and 3 tablespoons  purple RIT dye.  After, for the teal dye bath, pour about 1 1/4 liters of water, along with 3 tablespoons of salt into a container.  Then, add about 3 tablespoons of teal.
2.  If your ballet flat has a bow, you can tape it to the inside to prevent it from dying. Then for the fuschia/pink ballet flat version, quickly dip the front end of the flat into the fuschia dye bath. Then dip only about 1" into the dye bath for a couple minutes, so the tip of the flat is richer in color. Let this dry. For the purple/teal ballet flat version, quickly dip the front end of the flat into the purple dye. Then dip only about 1" into the dye bath for a couple minutes, so the tip of the flat is richer in color.
3.  To finish up the purple/teal version, paint on the teal dye with the sponge brush.  Leave a gap of about 1 1/2" unpainted.
4. Afterwards, run the sponge brush under water until fully clean. Then, paint on water at the edge to smoothen the ombre. Let fully dry.

DIY: Geode Ring

geodering1-e1339091457346.jpg
I stumbled upon this lovely inspiration photo of geode rings on Pinterest. You can make you very own with a few simple steps.  Make one... or ten!! :)  Have fun!!
Materials:
- Use Geode or Pyrite, easily found on eBay, Amazon or at flea markets and gem stores (*Make sure they have a flat bottom)
- Ring Blank (you can buy here)
- e6000 Glue (buy here)
Steps:
1. Add a small amount of e6000 glue to the flat area of the ring blank.
2. Place the geode or pyrite onto the glue.  Press in place, and let fully dry.

DIY: Wrapped Bracelet

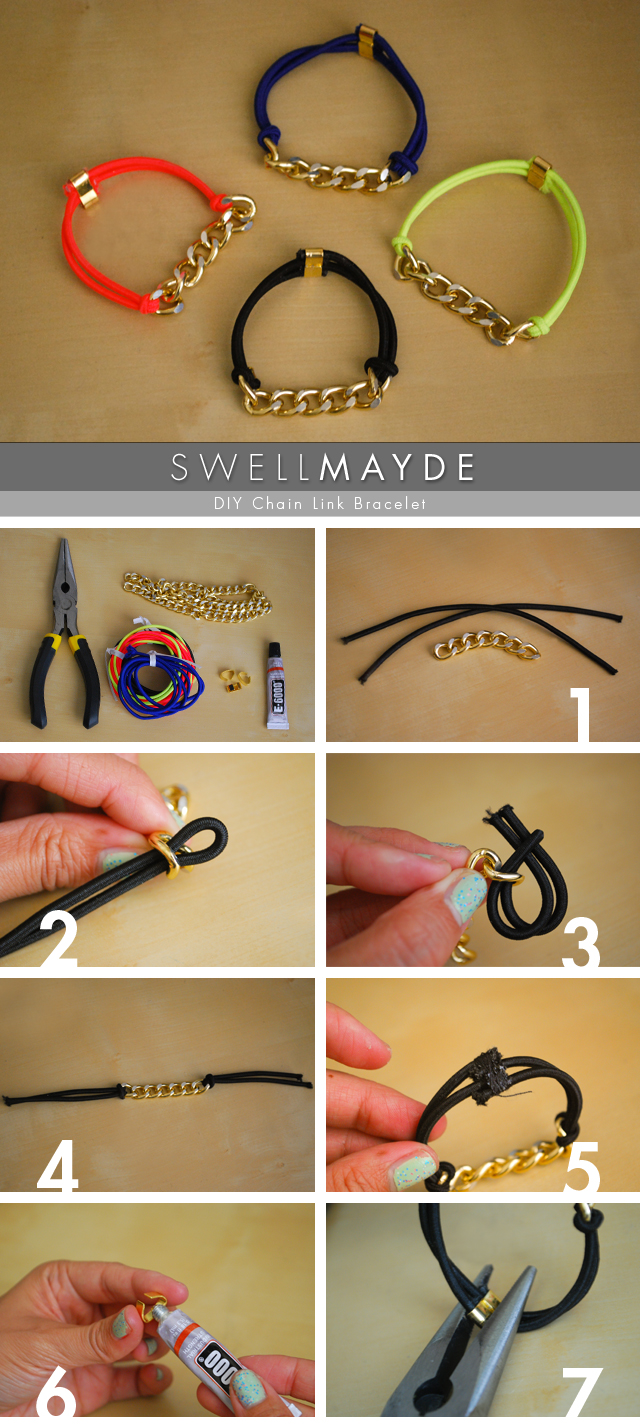
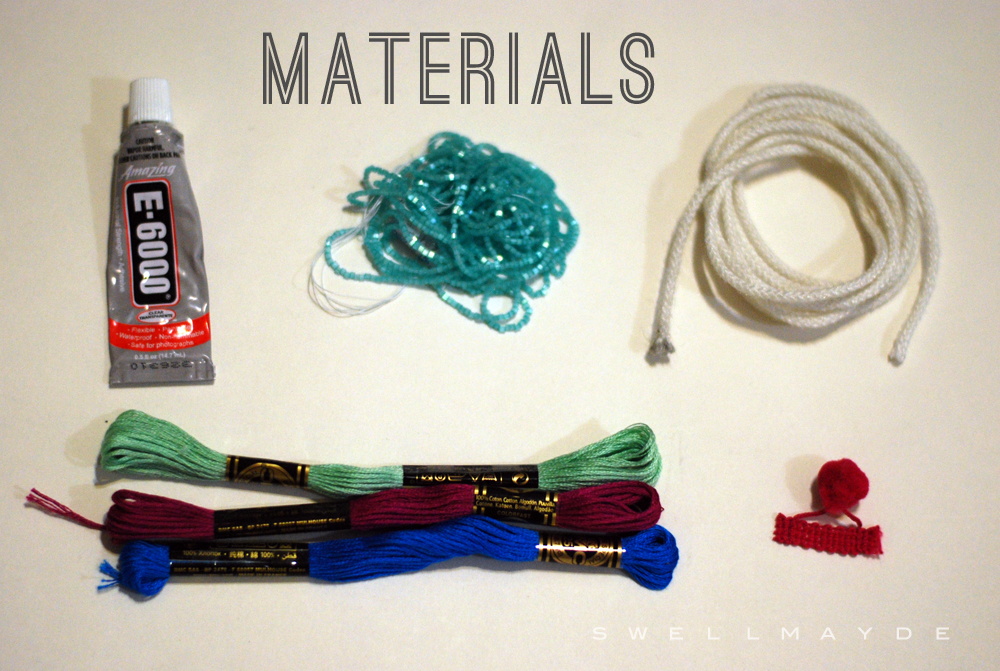
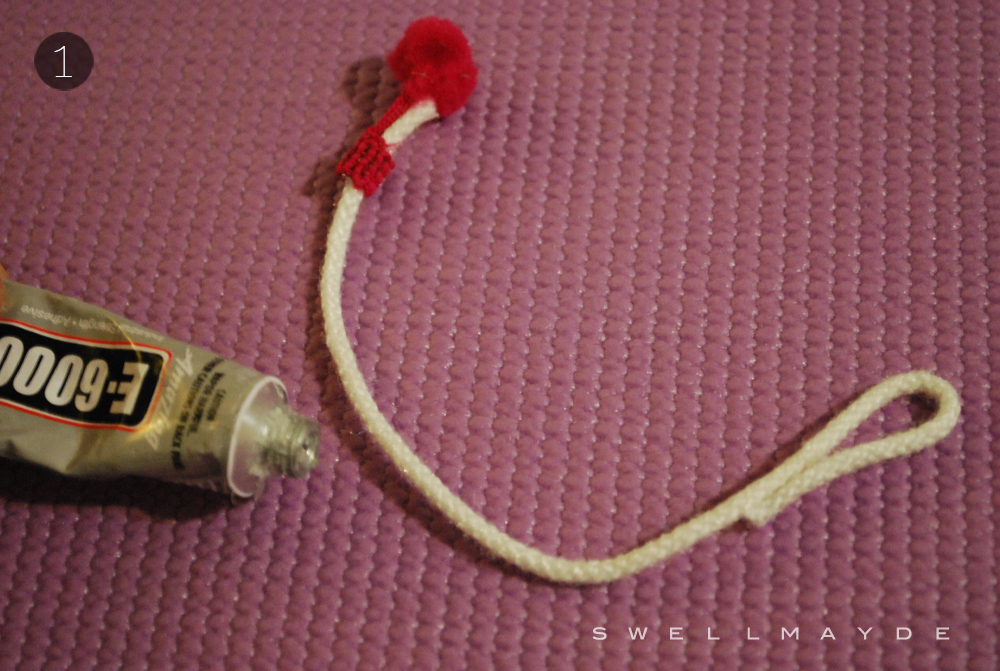
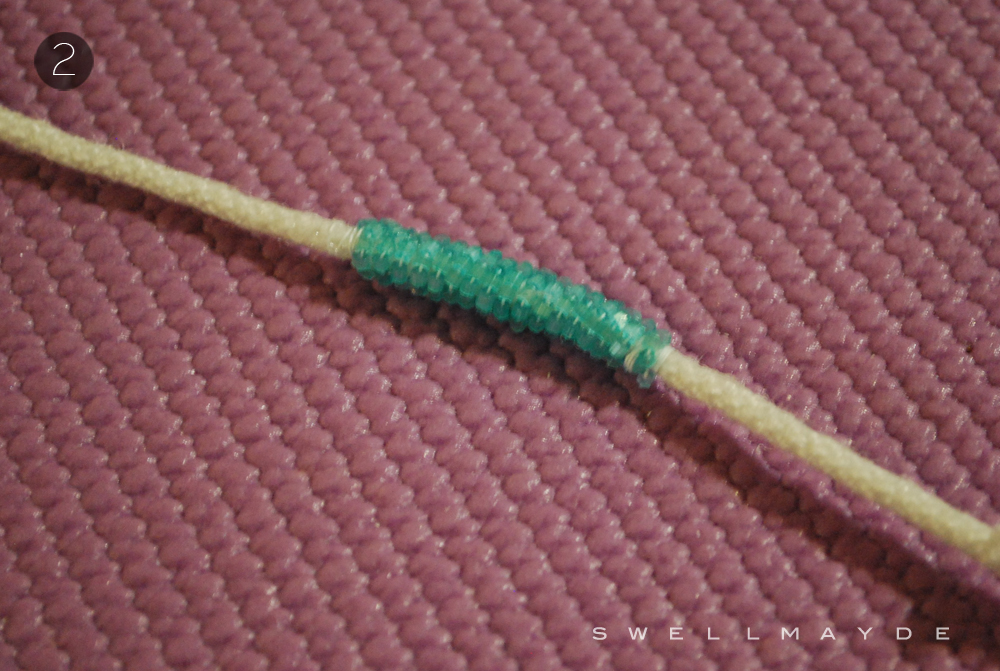
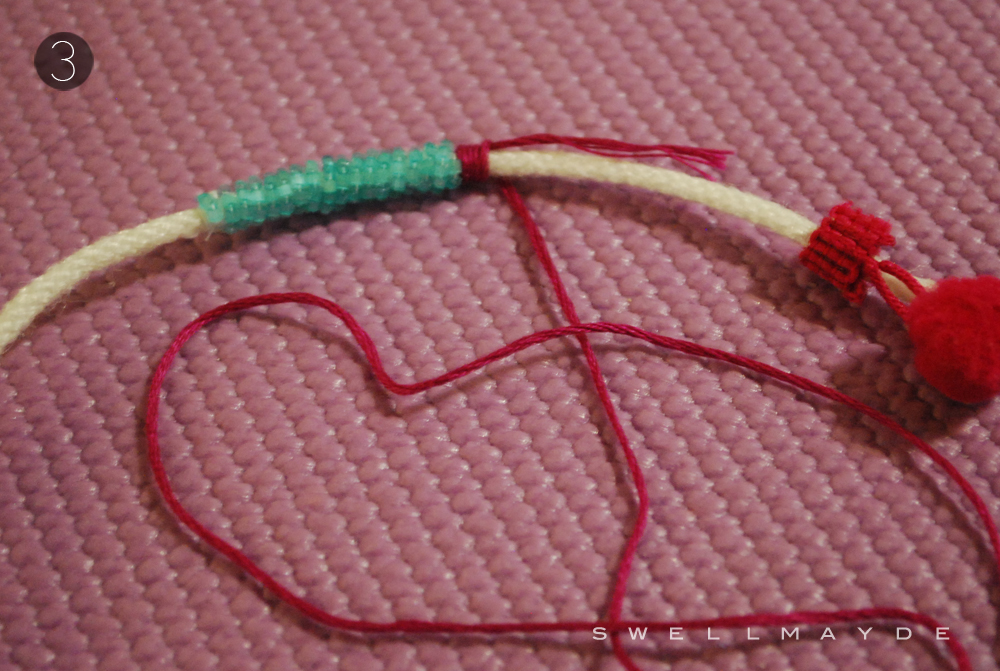
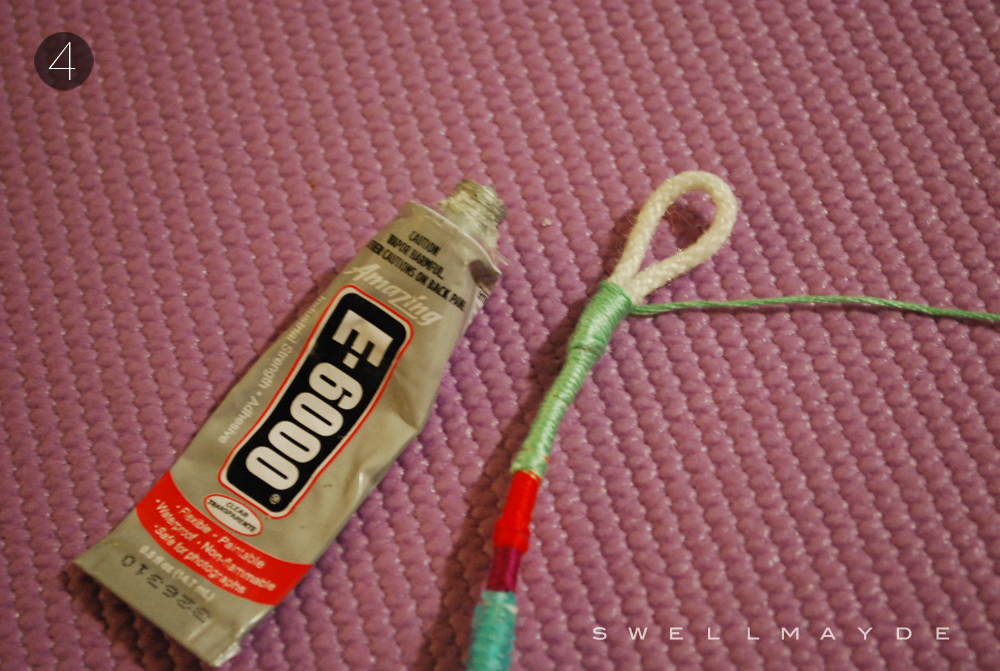
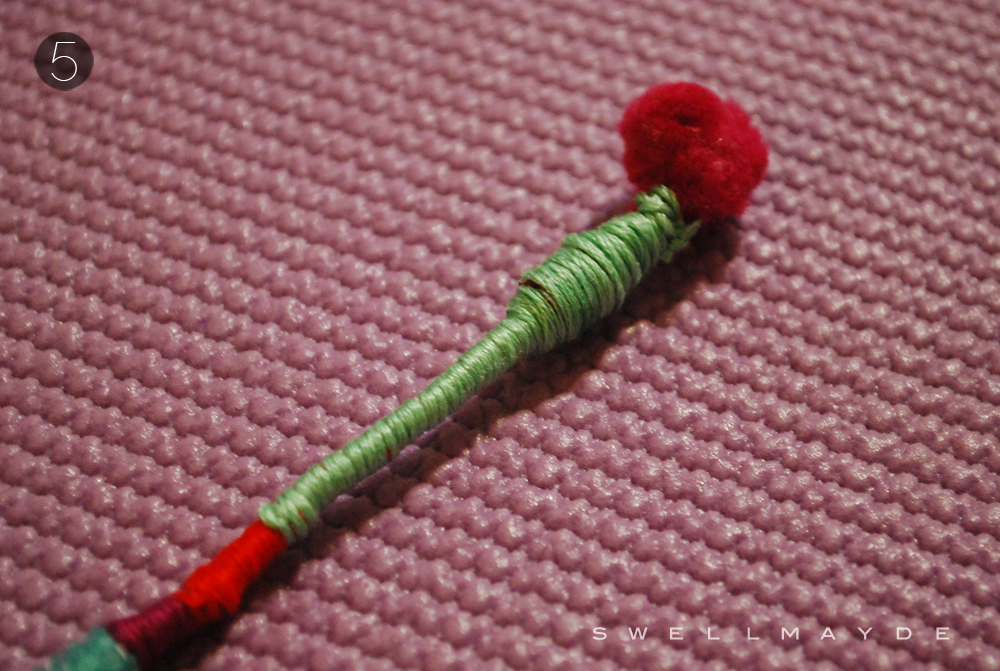
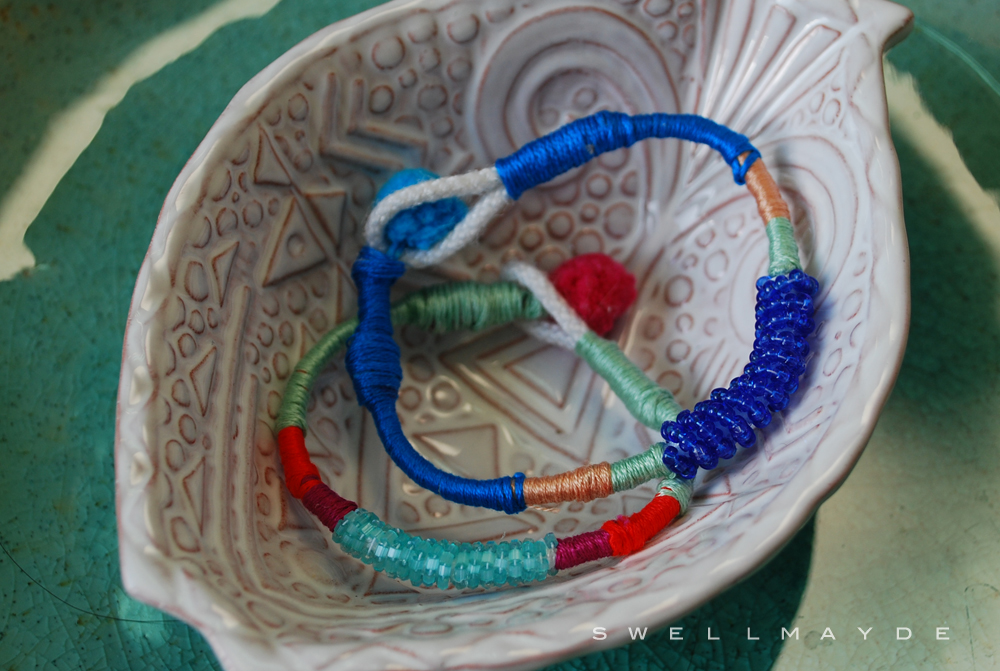
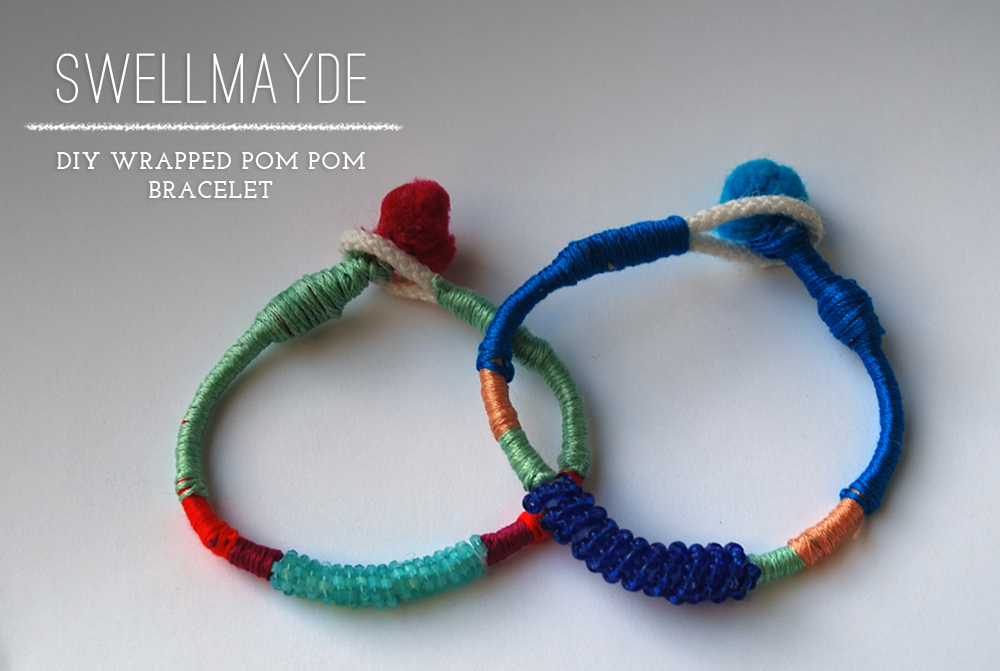
I am a really simple girl when it comes to my style.  My classic "Aimee" uniform consists of a white t-shirt or button-up and cut-offs.  I can basically wear that combination everyday, but what makes it feel different from day to day are the accessories.  My goal is to DIY more of them myself... so when I'm looking down at my arm party, it feels a little more personal.  Here's a fun wrapped pom pom bracelet I recently made.

Materials:
- Rope
- Strand of Beads
- E6000 Glue
- 3 Colors of Embroidery Floss
- Pom Pom Trim
- Super Glue
Steps:
1. Cut the rope to 10" long. Fold one end over 2" and using e6000, glue together leaving a loop large enough for the pom pom to go through. At the other end of the rope, glue and wrap the flat end of the pom pom trim around the rope about 1/2" below the rope tip.
2. Add a thin layer of e6000 to middle area of the rope, about 1" long. Wrap the strand of beads around the glue section. You can double knot at the beginning and end using the thin string that the beads are stranded on. Let fully dry.
3. Take your first color of embroidery floss, double knot onto the rope, leaving a 3-5 inch tail. Add a bit of super glue to the double knot to prevent it from unraveling. Begin wrapping around the rope and the embroidery floss tail until you achieve the desired length. Then, double knot with the tail end and add a bit of super glue to the double knot. Cut extra ends. Mirror this section to the other side of the beads. Repeat with the second embroidery floss color.
4. Repeat step 3 with the 3rd embroidery floss color, except when getting closer to the glued loop end, add a bit of e6000 glue to the end in order to secure the wrap. Note that the loop must fit the pom pom. Double knot with the embroidery floss tail and add a bit of super glue to the knot. Cut off extra ends.
5. Like step 4, repeat the embroidery floss wrapping except add a thin layer of e6000 around the pom pom trim area before wrapping. Then, double knot with the tail end of the embroidery floss, double knot. Add a bit of super glue to the double knot, and cut off extra ends.

DIY: Floral Print Denim Short

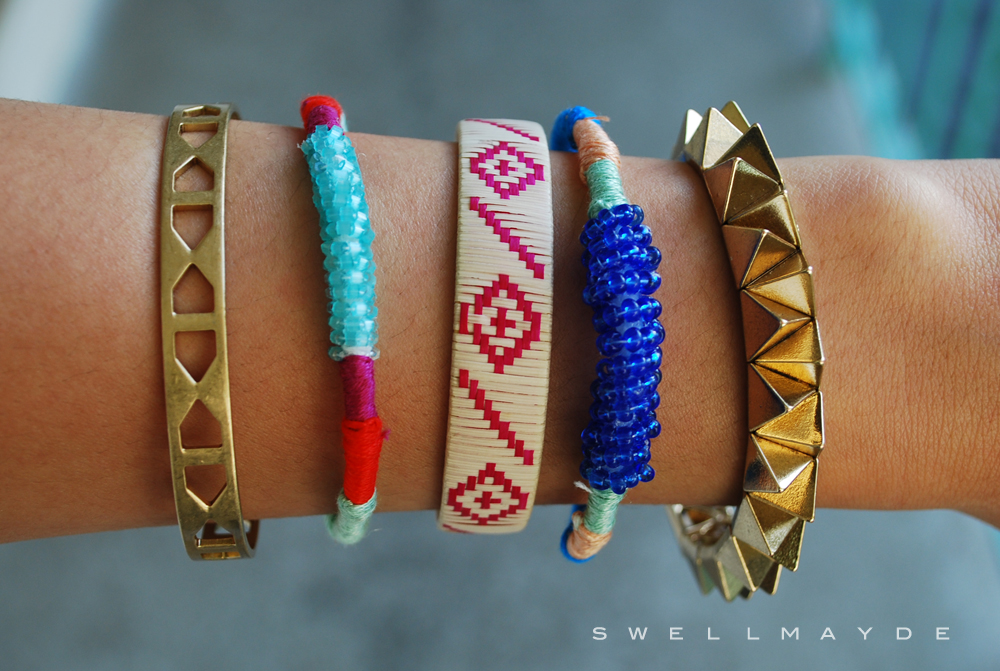
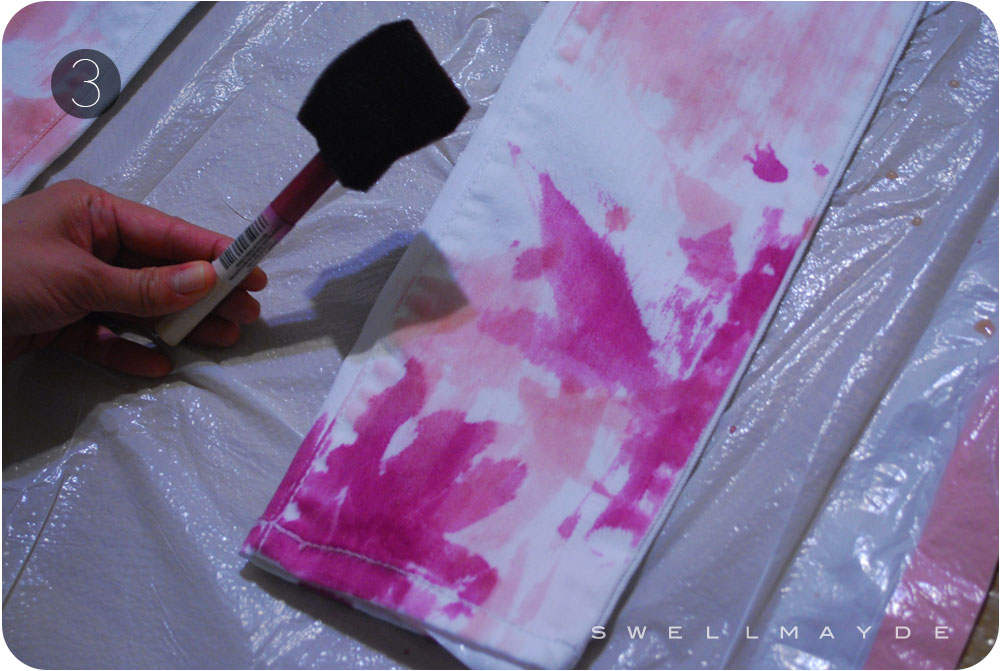
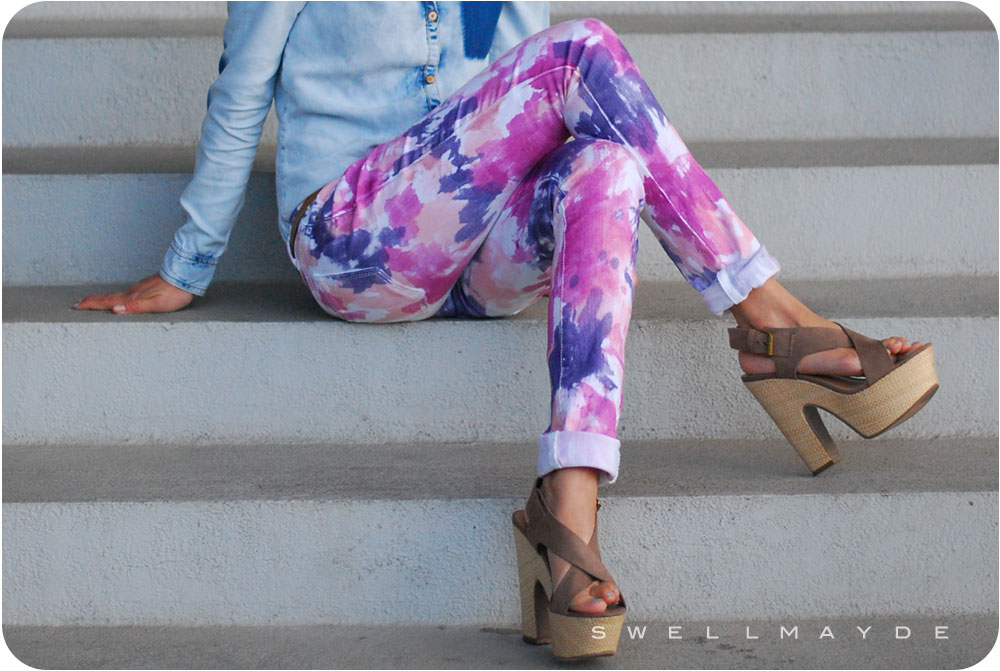
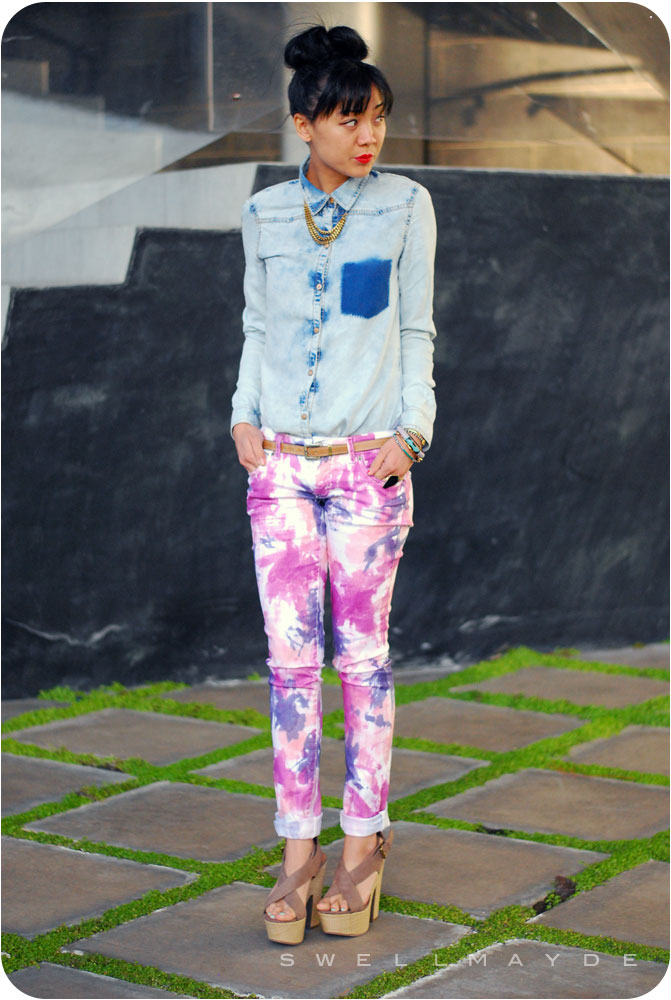
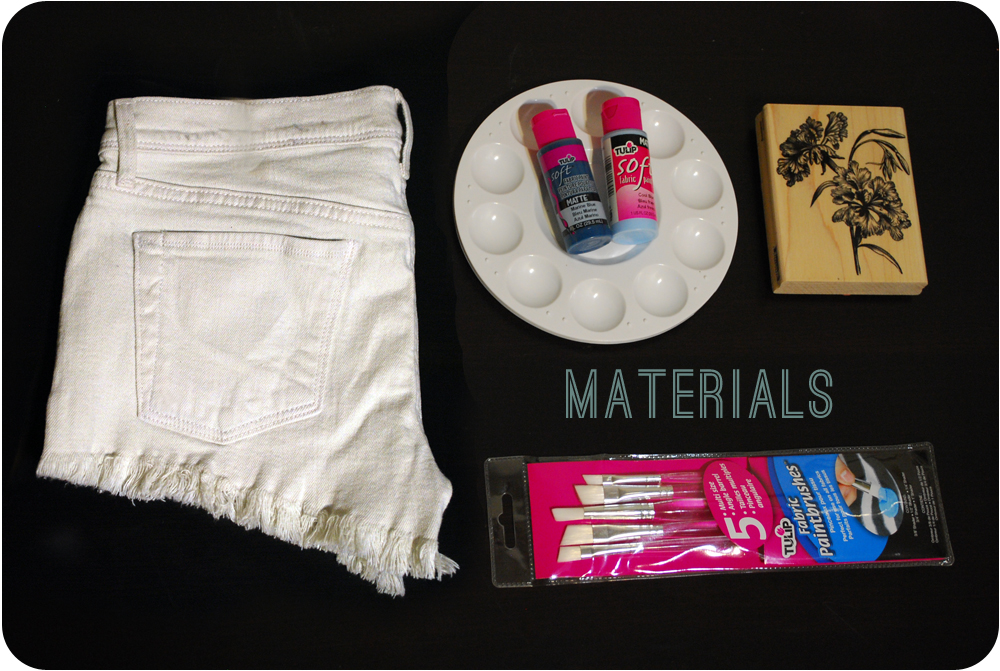
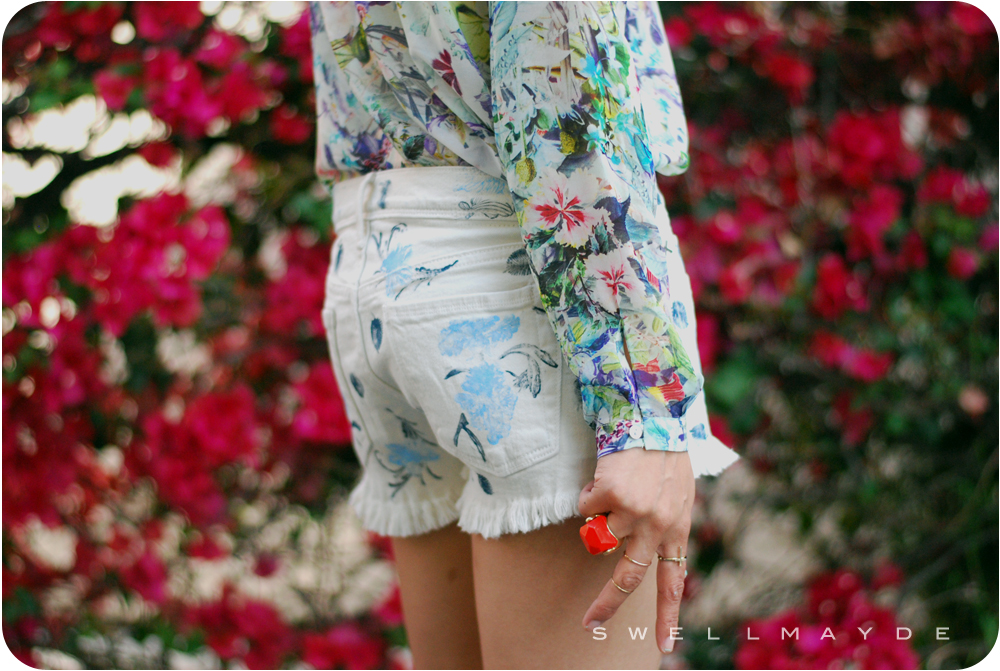
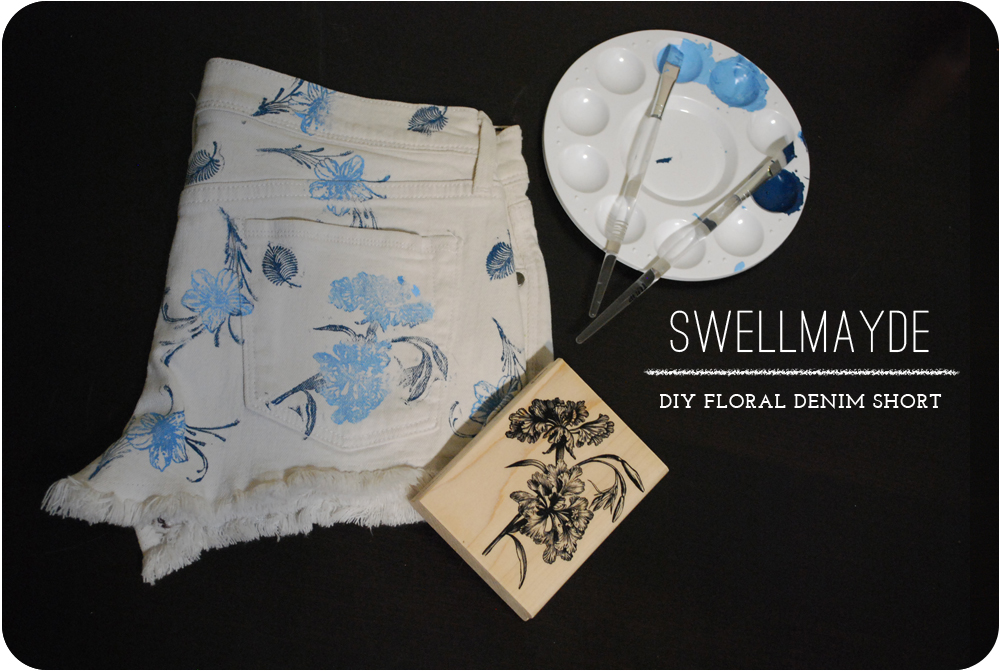
I'm really loving what is happening in fashion these days. Prints, florals and color are popping up in every direction. I never saw myself as a print girl in the past, but I have been taking more fashion risks lately in an attempt to find new outfit combinations that work for me. This DIY was inspired by my new found obsession with wearing mixed florals and have found that wearing color and unexpected prints really brightens up my mood! How can I have a bad day when ther is party going on in my wardrobe!? In this post, I will show you how you can update a pair of shorts with a stamped floral print so you can chime in on this trend.

Materials:
- Denim Short (similar here and here)
Tulip Soft Fabric Paint in Marine Blue and Cool Blue (here)
- 2 Paintbrushes
- Paint Palette
- Floral Rubber Stamps (similar here)
Tutorial:
- I used a variety of stamps that I had on hand. I recommend using a couple different sizes. Pour out each color of paint onto the palette. Paint a light coat of Marine Blue onto the stem and leaf areas of the stamp and Cool Blue for the flower areas. Be sure to use a light coat and maybe test it out onto a scrap fabric to make sure you like the look. Then, continue all around the short. As you are stamping away, I recommend cleaning the stamp (running it through water and wiping off any excess paint) after stamping a couple times, the fabric paint tends to dry pretty quickly. Let dry fully dry. Have fun!!

DIY: Braided Bracelet

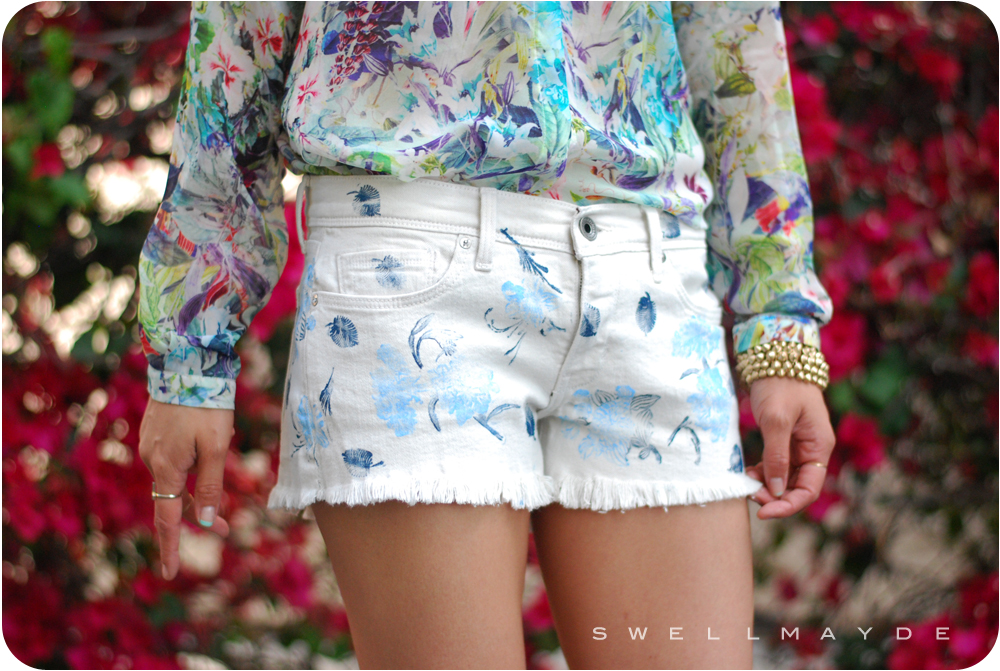
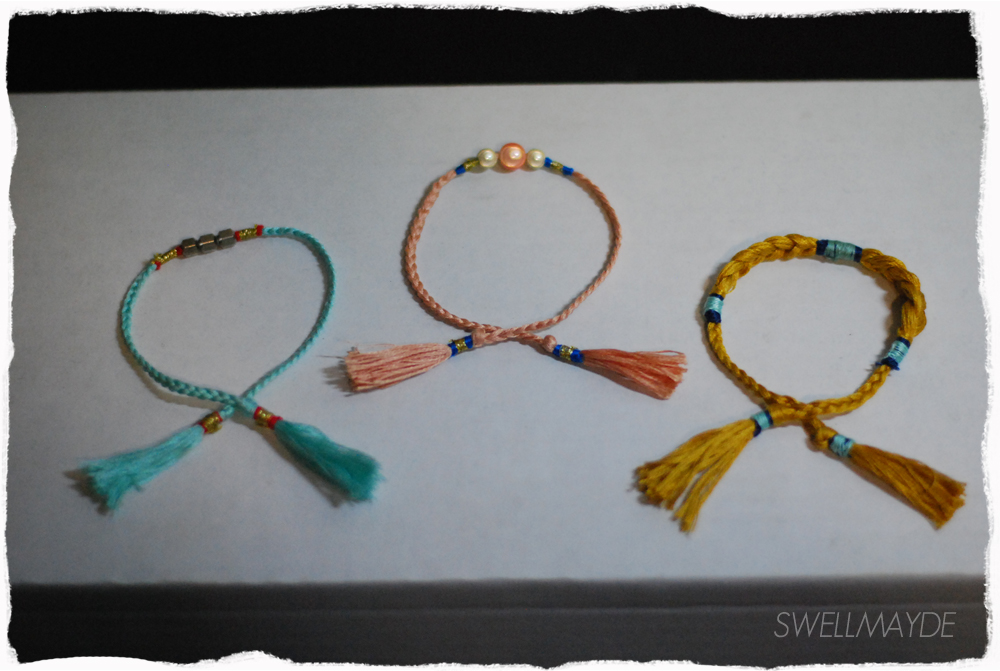
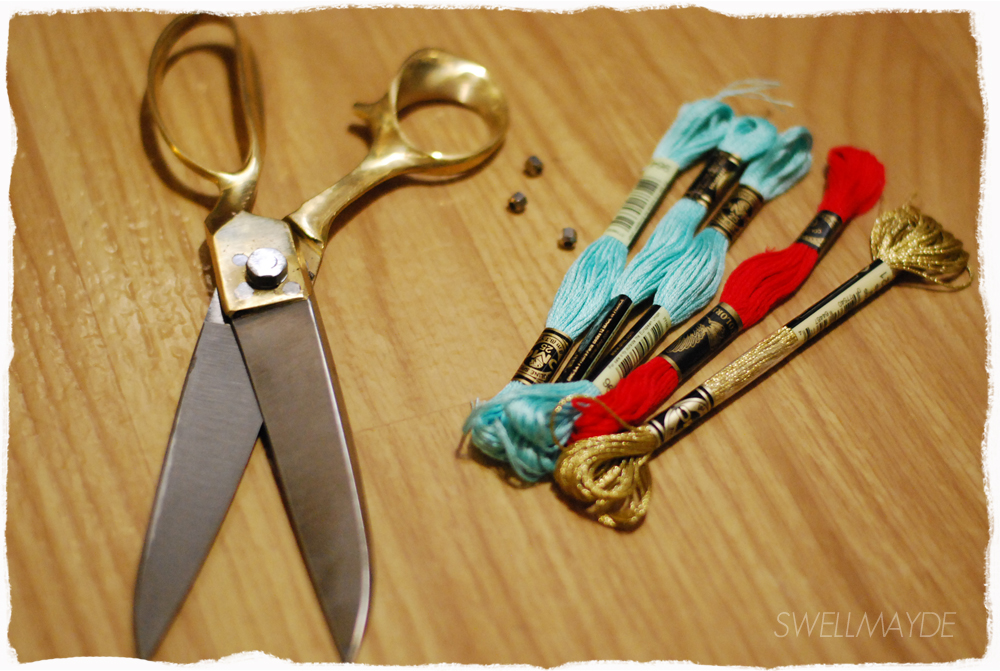
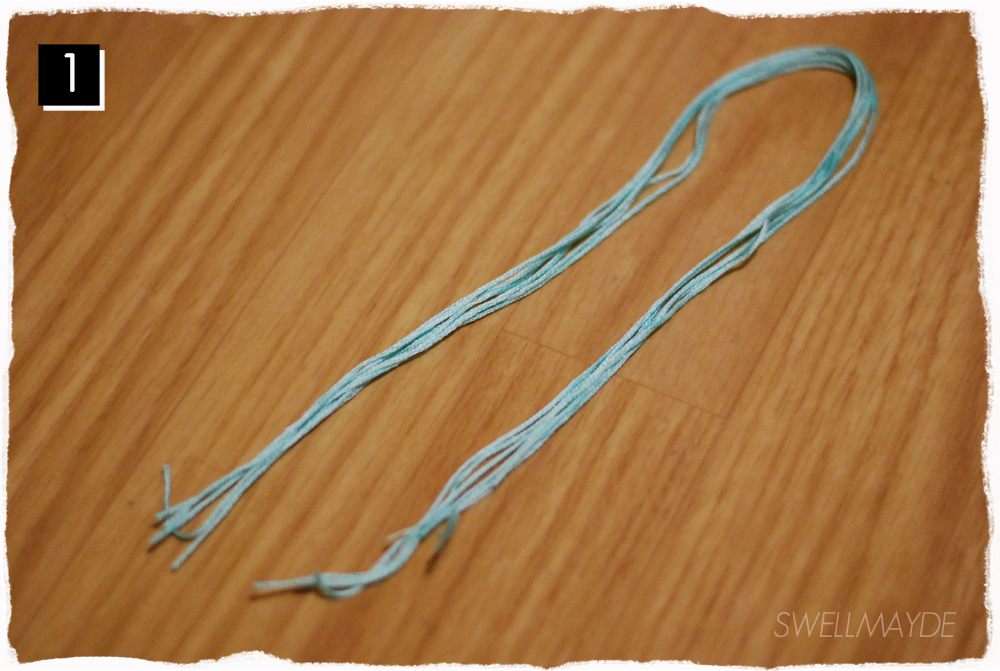
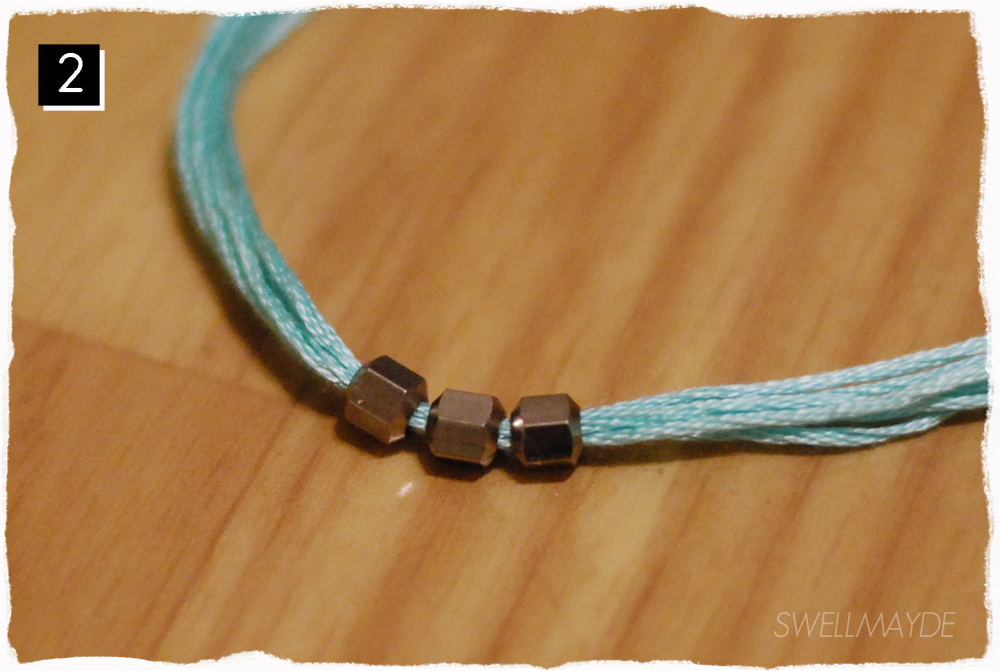
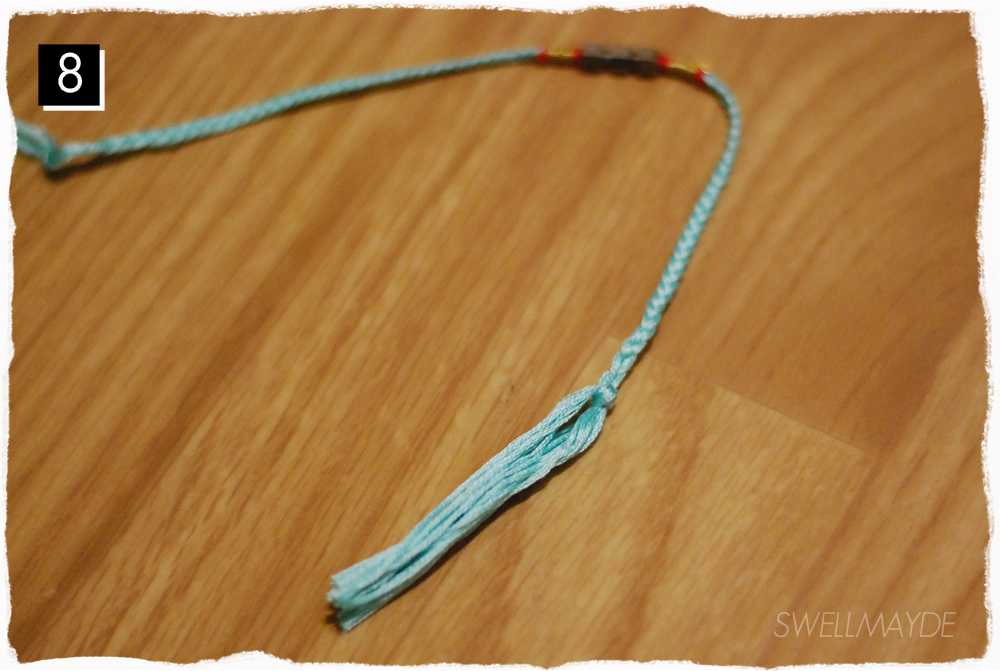
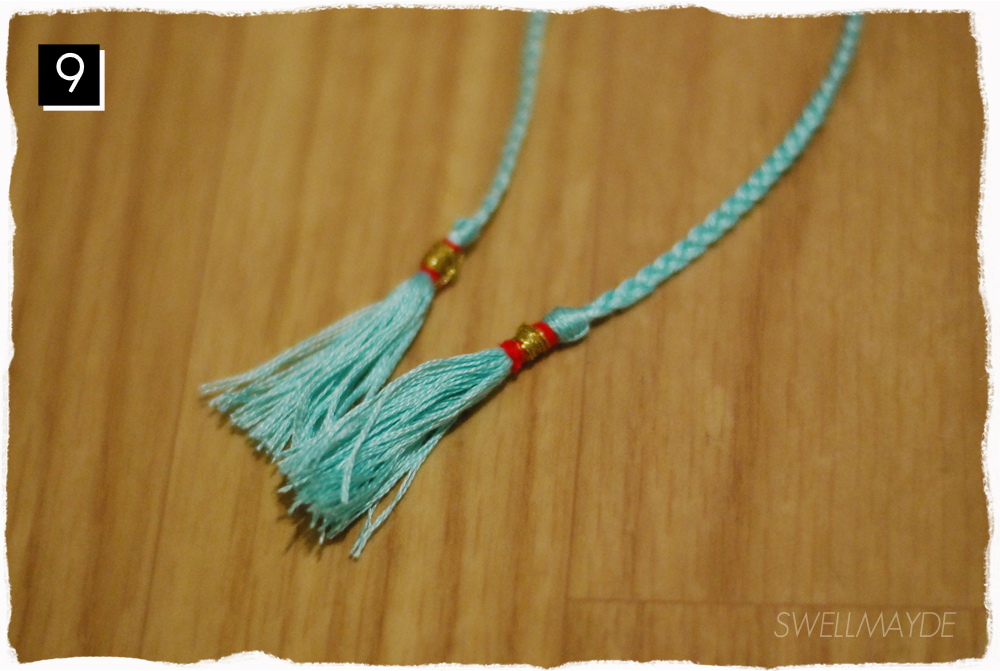
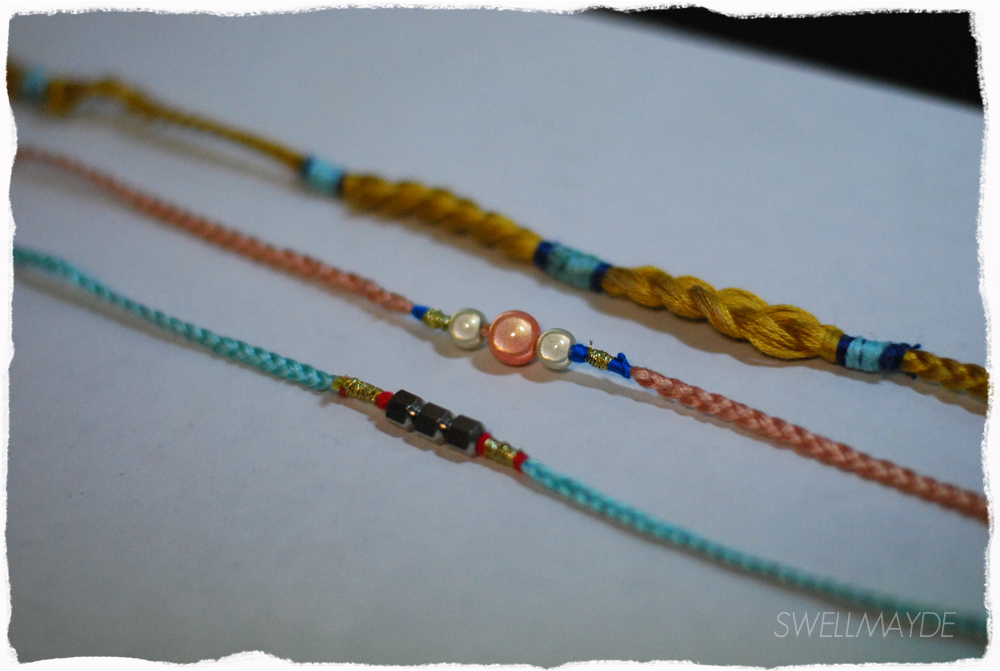
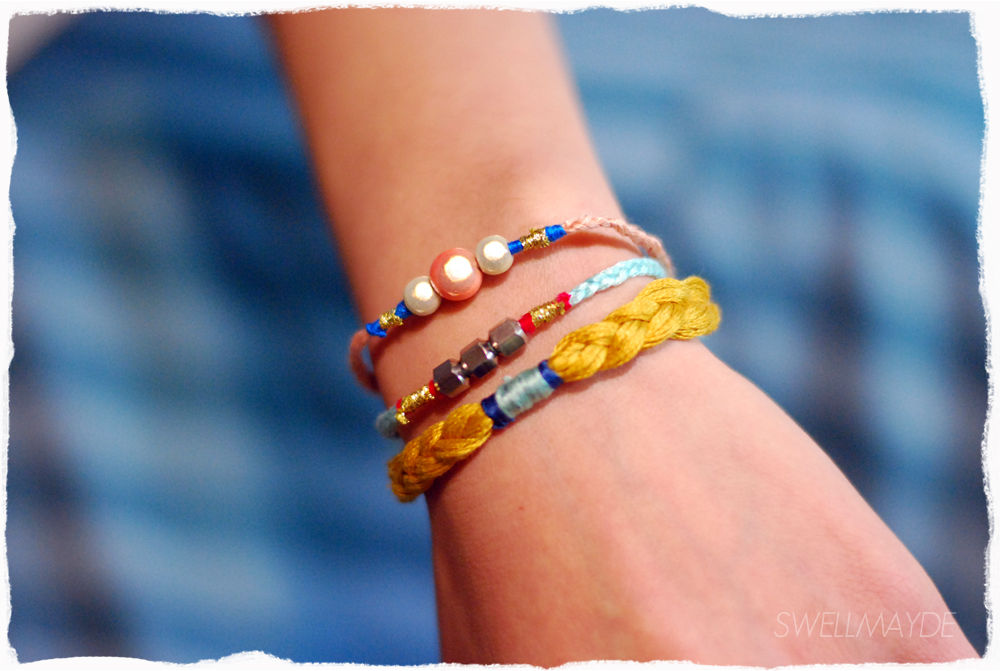
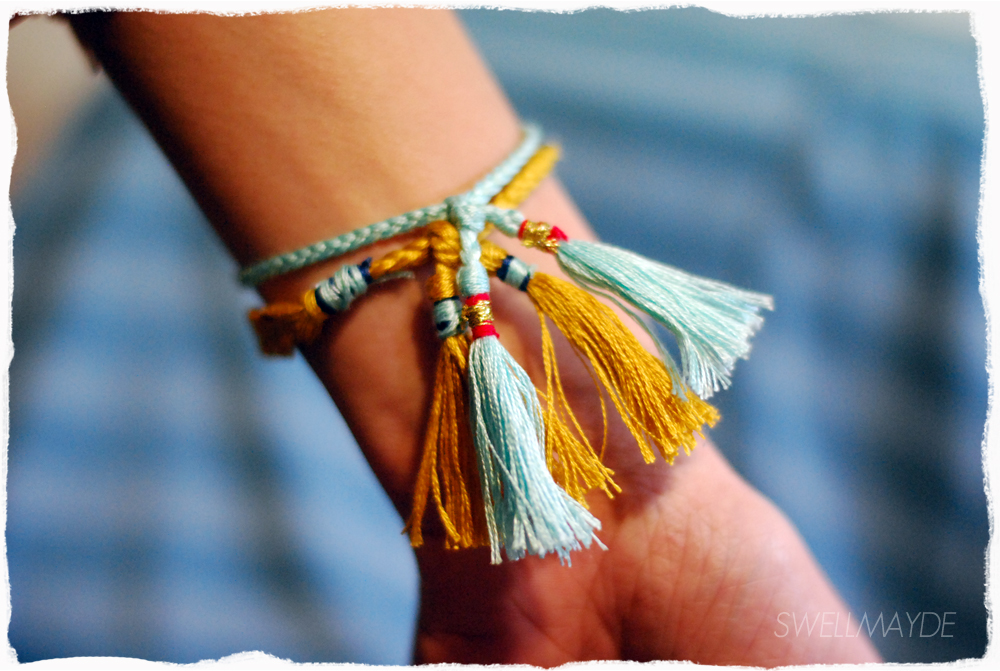
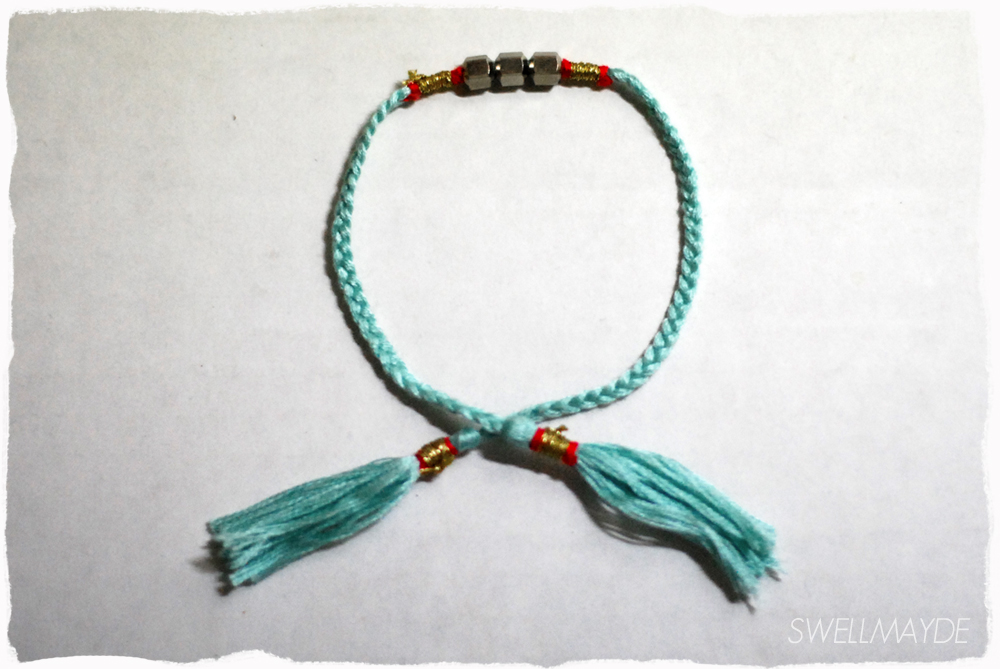
Learn how to make this awesome braided bracelet! Find detailed written instructions below the photos.

Materials:
- Embroidery Floss (3 different colors)
- Scissors
- Beads
Steps:
1. Cut 6 pieces of embroidery floss at 16" long.
2. String your choice of beads through the embroidery floss. Place in the middle.
3. Wrap the second color of embroidery floss around, about 3/8" long (knot at the beginning and end of the wrapped section).
4. Wrap the third color around, about 1/4" long (knot at the beginning and end of the wrapped section).
5. Braid the leftover embroidery floss, about 3 1/4" long.
6. Cut 6 pieces of embroidery floss (main color), about 3" long. Lay under the braided end, like photo.
7. Knot cut pieces onto the braid.
8. Trim ends to an even desired length.
9. Wrap second and third color embroidery floss around the ends (knot at the beginning and end of the wrapped section). And voila... a swell done braided bracelet!

DIY: Tie Dye Denim

This DIY kick starts my tie dye week (another version to come) and just might be my most favorite DIY yet!!  As I was perusing the latest Elle magazine, I saw an ad for Paige denim.  It was for a beautiful pair of tri-colored tie dye jeans (Paige Toulouse Verdugo Skinny).  I have been on a color obsession lately and had to have my hands on these. The price was a little out of reach for me, so I thought I would take a stab at it myself. The steps were pretty simple.

Materials:
- white skinny denim (I bought an inexpensive pair from Target here )
- RIT dye (denim blue, wine bordo, and petal pink)
- sponge brush
Steps:
1. Follow the steps on the RIT dye package to create your dye baths.
2. Using your sponge brush, paint strokes on the front side of the jean.  Start with the lightest color. I used petal pink. Note: I added a bit of tan to get a more coral color.
3. Paint strokes with the next darkest color on the front side of the jean.  I used wine bordo. Note: I added a bit of denim blue to make it a bit more magenta.
4. Paint strokes with the darkest color on the front side as well. I used denim blue. Note: I added a bit of wine bordo for a purple tint.
5. Once, the front side is fully painted, let dry and follow steps 2 through 4 for the back side.  Do not forget about the side seams, paint strokes to connect the front and back sides.  Let dry!  Try on and dance!!  You now have fun pair of tie dye denim!!  Swell done!!

Here's Looking at You... Tiger

This project’s mirror/faux magazine cover theme attempts a somewhat raunchy (although you can switch it up) approach to playing up your partner’s ego…and we all know there’s a little narcissist in all of us. This one’s pretty easy, once you get the materials—so here goes.

Craft O’ Meter (Level of Difficulty): Easy


Materials:

Alphabet Stickers (1” – 2”)

A Small Mirror (try thrift shops; I found mine at a discount store for $2!); approximately the size of a magazine cover

Small Plastic Animals/Toys (think cake topper size); type of toy depends on the phrase you decide to go with (see Step 1 for ideas)

Pin (optional)

Hardware:

Epoxy/Hobby Glue (the stronger, the better)

Masking Tape

Small Pliers (optional)

  Steps:

  1. Think of a compliment/phrase; I went with “Hey tiger.” and “Best Lover Ever”

Additional Ideas (in this order-- top text; bottom text; toy to use)

  • “Sexy Beast”; “You drive me wild”; any wild animal
  • Cutesy Alternative: “Such a dear”;” Sweetest Girlfriend Ever”; deer
  1. Use masking tape to make straight lines on the top and bottom of your mirror (to use as a guide for your stickers).
  2. Stick the phrase of your choice to their corresponding areas (I recommend choosing a bigger font for the top text and a smaller font for the bottom).
  3. Once the words are in place, it’s time to glue the animals. If you choose to go with the “mating” position and think you’d like a little more stability (aside from glue), use a pin (cut off its head so that you have two pointy sides) and pliers to stick the two together. You can also go simpler by just gluing the toys on top of the frame.
  4. Let dry overnight.
  5. Clean the mirror to remove any fingerprints/dirt.
  6. All done. Start gifting!